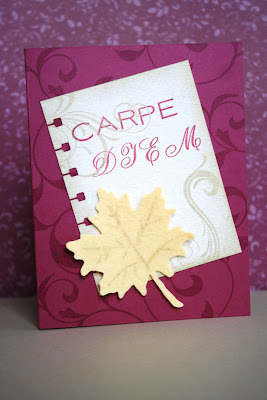
I used some spare maple leafs I punched from a previous card. I used those to make my flowers, and a flourish from PTI's Fancy Flourishes. The sentiment is from Everyday Button Bits.
Saturday, October 30, 2010
Friday, October 29, 2010
Mummy Oreos
I found this idea when someone on the PTI forum posted a link. I HAD to try these. Here's the link: Halloween Cookie Suckers
The website with the instructions even has a free downloadable PDF for the bags. I used the snapshot tool on Adobe to only print out the front of the bag (I'm stingy with my colored ink) and added some orange stickles to the center of the circles. I made the box out of Basic Black and added the spider web stamp from Spooky Sweets II (PTI).
The mummies are wrapped in sucker bags I picked up at Michael's, and super thin orange ribbon. I stamped little tags from the retired SU! set Boogily Eyes. I used a watercolor pencil and blender pen to add some color to my mummies and topped them off with teeny tiny googily eyes. I matted the mummy image with Rich Razzelberry scalloped circles. On the back I stamped 'Happy Halloween' and a little pumpkin.
Some tips - my 'Boo Box's were a little top heavy from the suckers, not sure what would work best to keep these upright. That's why they're photographed laying down.
Wednesday, October 20, 2010
FTL112
I have more ideas for this layout, but here is what I came up with yesterday afternoon. Stamped the text style stamp on Barely Banana in So Saffron. The sheer ribbon I picked up at Mike's and it's a perfect match to Rich Razzleberry.
Sunday, October 17, 2010
Christmas Card Caddy
I saw this idea a couple of years ago in Holiday Cards and More (Vol.3) and wanted to try it. This year I was able to find the caddy at Hobby Lobby and finish it off with some of the Holiday paper I had left over from my other Christmas crafts. (see original post December 6,2009)
I began by sanding and then painting the inside of the caddy with two coats of Santa Red paint. After tracing each section with a pencil, I cut out my patterned paper. I assembled the front section complete with label and Pointsettia before attaching the panel. I brushed a thin layer of Modge Podge onto the wood and then placed my paper. I chose the 'Holiday Wishes' sentiment instead of simply stamping 'cards' on the front.
I began by sanding and then painting the inside of the caddy with two coats of Santa Red paint. After tracing each section with a pencil, I cut out my patterned paper. I assembled the front section complete with label and Pointsettia before attaching the panel. I brushed a thin layer of Modge Podge onto the wood and then placed my paper. I chose the 'Holiday Wishes' sentiment instead of simply stamping 'cards' on the front.
Friday, October 15, 2010
Cinema Saturday #98
I haven't participated in this challenge in some time, but thought I'd give it a try this week. I remember seeing this movie in the theater, and I loved it! I think it's one of Robin Williams' best performances. I admit I was a little stumped with the felt challenge. I added the lines on my maple leaf with a marker, but later thought maybe I should have stitched the lines. Not my most favorite work - but I gave it a try.
Tuesday, October 12, 2010
Glitter Maples
I love the colors of the leaves in fall. I used Martha Stewart Glitter in three colors to create this card. I cut the squares to 1.5 inches. I ran the backing through the sticker machine and coated it with glitter. I used chocolate bakers twine and a Harvest Gold and Orange Zest button. The sentiment is stamped in Really Rust. My favorite is the orange glitter.
Saturday, October 9, 2010
Maple Leaf Gratitude
I've seen Maile Belles do this a lot (and Arielle Gordon as well) and thought I'd try it on my own. As I was testing out the idea, I realized that I needed to place my buttons on a piece of paper that matched the color of the buttons in order to allow the gaps between buttons to go unnoticed. I covered my orange square with Extra Wide Tacky Tape and placed my buttons. Then, I thought, maybe I could fill in the gaps by pouring glitter in instead. Since the tacky tape already covered the area, the glitter sticks like a charm. I like the tiny bit of extra glitz when the light hits it (even if you cant see it well in this picture).
Subscribe to:
Posts (Atom)


